Total Pageviews

Sunday, 14 July 2013

Where Did June Go? Vintage Tea Rooms, Travel and Some Craftyness for Good Measure

It's a sure sign of age when time passes you by quicker than you can blink! We are already half way into July and I'm still thinking about June!

June was a busy month for me with a wedding, birthdays and 2 weeks holiday. I did get some crafty activities done though and to keep you all upto speed today's blog will be more visual than written. 

Let's see what June brought me..... 

Biddys Tea Room, Norwich

Our holiday took us down to Norfolk to visit my mum. We stumbled across Biddys Tea Room which is the most gorgeous vintage tea room ever. We sat upstairs but looking at how comfy and inviting the lounge looks will make that my next destination. The cakes were lovely and homemade full of filling and flavour. Delicious! Just wish it was a bit closer to home!            

http://www.biddystearoom.com

    Cake and coffee on vintage crockery

   Caramel cake.......I could scoff the pic!

    Love the decor!

    The lounge, how cosy!  


The Poppy Line Steam Train, Sheringham

Another step back in time took us onto the Poppy Line. You can take a 20 minute train journey on an old steam train or diesel train and enjoy travel like it used to be. How different our trips to work would be if we still used steam train! 

    Choo choo!

   Me and mum enjoying the ride with our                                       new handbags

Home Improvements

A trip back from Norfolk always comes with a "Can we go to Ikea on the way home?" from me. It follows the same pattern every time, we go, don't really know what we need, pick things up, realise we have picked up too much, get frustrated and argue then put some stuff back. If only Ikea were a little closer to Aberdeen! Our trip however did get us some things and we quickly got organised and got David's dad around to help us put things up. Finally our house is starting to take shape! 

   Our new picture rail above our bed

    A brill way to showcase my trinkets

    A map of the world which is actually gift wrap

I added old book pages to create a border for framing

Finally added a large curtain over our massive hall window. Dyed using Dylon machine dyes.

   New living room mirror, covered completely in stamps by moi

    Close up of mirror corner

    Took me hours to cover the mirror!!!!

    Patchwork cushion courtesy of my mum

   Patchwork wall hanging made by my mum now on my living room wall :) 


Tuesday, 28 May 2013

A Little Splash of Paint and a Bunch of Doilies - Screenprinting Fun


May is soldiering on and so is my household crafting! I have to say I am getting really excited about this task and I have well and truly got crafting fever! It’s a relief as some months ago I was having a complete crafting lull and wondering if my creative streak had become dormant. Thankfully not, if not for my sake for the sake of my spare room which is stuffed with random beads, ribbon and fabric swatches.

After my last blog I decided to share my work with the newly published Reloved magazine on Twitter, and to my delight they re-tweeted my blog. So if you have found me via Reloved magazine then welcome!


Recently I have been putting down the sewing needle and picking up the paintbrush. Ever since I moved into my house I had aimed to paint the kitchen. I’d seen a gorgeous colour of pink in B&Q and bought 2 tins without actually planning the room it would be used for. About 12 months ago I painted a swatch on my kitchen wall and thought yes.........this is the colour I’ll use to paint my dining part of my kitchen. It has taken me until now to do it, although to be honest I think it was more the task of deep cleaning the grimy greasy walls that stalled it for so long, plus the fact that at present our overhead extractor fan only actually extracts to the top of the cupboards........not so pleasant, however I’m happy to say that is also in the pipeline to be changed.

After my bookcase revamp in the kitchen I decided just to get the paint brushes and rollers out and just paint the wall. I’m pretty happy with it, I mean its pink but it’s a grown up, sort of dusky vintage pink which happens to compliment all my other revamps quite nicely.


I also want to share with you my other paint related project, my doily screen printed table! This I’m particularly chuffed about. Read below to see exactly what I did to my new glamorous kitchen table.

How to Make a Doily Kitchen Table


What you will need:
A piece of wooden furniture
Sandpaper
Soapy water
Cloth
Water based paint suitable for wooden interiors x 2 colours
Rollers/brushes
Paper doilies
Screenprinting kit (screen and squeegee) 
Varnish

1. Once you have found the piece of furniture you wish to revamp you first need to prep it before you can paint it. First give it a wash with some soapy water to lift off any grease and dirt and dry it down. If the piece has been painted or varnished before you need to use sandpaper and sand all the paint or varnish off. This will help key the surface and give the paint some grip. Once you have sanded your item give it another wipe down and leave to dry.


2. With my design I wanted to create a two colour effect so before I could screenprint I had to paint a layer of white paint as a base. I just used water based paint designed to be used on wooden interiors. To keep the paint looking even I used a mini roller compatible for use with water based paint, painted a thin layer and then did a second coat. Now comes the waiting game, you can’t do the next part until it is completely dry so lights out and let it dry overnight.

3. Now for the fun part! Take your doilies and lay them on top of the table, play around with your design. Try a variety of shapes and sizes and don’t overcrowd your table too much, you want a nice balance of the white and coloured paint. Paper doilies work well for this project as they are thin and act as your stencil, don’t be tempted to try it with a fabric doily, not only with you ruin it but the thickness of the material means that you won’t manage to get a nice neat and sharp print.


4. Once you are happy with the layout you can begin to print, remember that the part of the table which the doily covers will remain white, whereas the rest of the table will be the colour you selected to screenprint, in my case duck egg blue. If you are not familiar with how to screenprint you can find good tutorials by googling screenprinting tutorials.


5. Ideally you should have a screen which is large enough to cover the area you want to print, unfortunately my screen wasn’t so I had to do a bit of fiddling about – it also means that you should really wait for your first side to dry before you print the next side – I couldn’t wait that long! The key thing is that when you are printing you want to be firm and even, you want to make sure the paint goes through the screen and the doily cut outs without spilling through too much and producing undefined lines. You will probably need to pull the squeegee across your screen and back again in 2 cycles.

6. Once you have printed, CAREFULLY peel back the screen, you may find that some of the doily has stuck to the table, don’t worry just very carefully peel it off. If you need to touch up any bits use a paintbrush and blend the paint in, leave to dry and then coat with some varnish to help seal the design in. There you have it! A beautiful feature table perfect for afternoon tea and cakes. As you can see the colour compliments my wall and previously painted chairs wonderfully. 


Pssst, I have one more really quick doily make! This time you use crocheted doilies that you can find from markets or charity shops to make a beautiful decorative bowl.

What you will need

A crochet fabric doily (not paper ones)
A bowl
A can of spray starch (you can find in the laundry aisle in the supermarket)

1. Ideally you should use a small doily as you will be able to make a smaller more robust bowl, I only had a large doily and although very pretty my bowl is very delicate to use. Wash your doily and iron it .

2. Find a bowl that you can mould your doily around, this is how you will form your doily shape. Put the bowl face down with the base facing upwards and pop your doily on top.


3. Wet your doily in starch, this will harden as it dries and sets the shape. I needed a lot of starch and soaked my doily, however for a smaller doily you will not need as much. Spray enough to wet the doily, to create a pinched edging for the top of your doily bowl work your way around the doily and pinch together and mould the doily to show you want your bowl to look.

4. Leave to dry, you will need to leave until it is completely dry, this could even take longer than overnight so be patient.

5. Once dry take it off the bowl and there you have it, your very own doily bowl! The beauty of this project is if you get fed up or it starts to lose its shape you can pop it in the washing machine and start all over again.


Ahhh doily heaven!

Sunday, 12 May 2013

Who said wallpaper was just for walls???


Hello!

April flew by as quickly as it came for me, I can’t believe we are sitting in May already!

My crafty challenge for April has kind of grown arms a bit as I’ve found too many things I want to do, so this craft challenge is a special 2 month one and will last until the end of this month. So what is it??? My latest craft is...........Crafts and DIY for your home........ok so not exactly a new craft or particularly refined but this is what is exciting about this one!

Does anyone else buy crafty or homes magazines see loads of things they like and then cast aside the magazine into the dark depths of the magazine rack to gather dust? Or like me do you pile up your magazines, then every so often go through and cut out/pull out the stuff you are interested in, create another pile and then leave that. Then after sometime find a use for the image you have kept or decide to do the project you kept? Well that is most definitely me, I have various piles for different crafts with good intentions to make “at some point”.

Ripped and cut out future project ideas!


The idea for this month came when I decided I wanted to revamp a chest of drawers we got when we moved into our house 2 years ago. May I just mention despite purposely buying plain unpainted furniture with the view to paint, it has still taken this long to happen! But I didn’t just want to paint my furniture I wanted to stick wallpaper on it and paint it. I’d seen this done in various magazines and thought it looked really effective.  Two years certainly gives you plenty of time to plan and I had already managed to accumulate the chosen Laura Ashley wallpaper (reduced bin!) and handles of my choice, it was now just time to get the project underway. 

In true Camilla fashion this project is still very much underway but here is how I have got on so far.

How to Wallpaper Your Chest of Drawers


1. Starting with a chest of drawers I gave them a quick clean with a damp cloth to wash off any dust or dirt. I decided to turn the wallpaper horizontally so that there was no joining line down my drawers, I quite liked the way this particular paper looks horizontally. I started out by measuring the width and length of the drawers and roughly cutting the paper down to size. I was generous and left excess paper, it is better to do this than be short, all you need is a sharp craft knife to trim it to size. With my wallpaper the width of the paper would cover 3 rows of drawers so I cut all my bits out and then blu tacked them on the drawers to see what it looked like. It is also easier to trim the paper down to size when it is on the drawers as you can use the edge of the drawer as a guide to run your craft knife along.


2. Once happy with the paper blu-tacked on and trimmed I took it off and covered the back of the paper evenly in pva glue. You need to work fairly quickly as the glue won’t take long to dry. Carefully place the wallpaper onto the chosen drawers and smooth out any air bubbles. If your paper is slightly too big just use your craft knife to trim to size, et voila!

The first stages of applying the wallpaper

3.  When it comes to placing on the next set of paper on your drawers remember to look at your paper carefully if you want to continue the pattern on. Trim to size and repeat the steps above. You will then end up with something like this.........

Wallpaper all on, now time for the handles

4. Lastly you need to coat your wallpaper with varnish to seal it in and then decide on your handles! I found these beauties in the sale section in a local gift shop for 99p each. Total cost for the handles was £11.88, bargain considering some handles retail at £2.50 each or more! To fix the handles you will need to make a hole in the front of the drawer where the screw will go through. Use the existing hole as a guide by poking a pointed implement from the back of the drawer to the front.

Et voila!


Chest of drawers or piece of art?


Pretty handles, a steal at 99p each!

There you have it! A truly unique chest of drawers which can totally transform a room. Now all I have to do next is paint the wood!

I didn’t stop there, I decided to spread my love of wallpapering to the kitchen. See below how I managed to liven up a bookcase with a little wallpaper, pva glue and by displaying a load of my favourite items. I still have plans to add more but I will tell you about that later as more crafty DIY makes pop up over the next few weeks!

Newly pimped kitchen bookcase!

Sunday, 31 March 2013

Craft a Month February - March : English Paper Piecing Quilting

Hello and welcome back!

The craft challenge for the months of February and March didn’t quite pan out as to be expected, with craft challenge 2 taking up half of February and all March.  Maybe the idea of a craft a month isn’t as easy to complete in reality, however I will still continue to give it a bash. So what have I been working on???

My nimble fingers have been frantically........or not so frantically working on English Paper Piecing. For those not in the know this is a quilting technique which uses paper templates and hand sewing. Quite simply you use a template such as a hexagon or square, tack the fabric onto the paper template and then join them together. The paper template helps acts as a support when sewing the shapes together which you remove along with the tacking thread once your project is complete.  A lightweight piece of card works well as a template but you can also use paper. When I first started my mum gave me a set of templates which she bought online, however you could just find templates of shapes online and print them out, with a little use of a photocopier you can also resize them to a size that suits you. Easy!

My mum has a fantastic talent when it comes to quilting but I find the science of being exact quite hard and need a helping hand. English paper piecing appealed to me as it is simply sewing fabric around a shape and then sewing them all together. There are two things  I value the most when it comes to crafting and that is relatively quick projects and projects I can do whilst being mobile, chatting or watching TV. Don’t get me wrong a project which I need to concentrate on and that takes longer to complete isn’t completely off my radar, but I like the satisfaction of a quick make, particularly as I take my time with things (cue my beautiful unwearable Fairisle jumper I was knitting for 2 years).

English paper piecing is a craft I have tried before, however in true Camilla fashion I launched straight into the project without actually knowing what I wanted to make as the end product. This approach didn't work as I got to the point where I looked at the hexagons I had sewn together and thought “now what?” This then spiraled into a cloud of uncertainty and the hexagons ended up where so many other projects do, in the "I'll finish it later" box. This time around I wanted to make sure my hexagons would be part of a finished product one day!

As you now know from my blog I enjoy making jewellery and I cannot help but think with everything I make “could I make this into some to wear?”  This didn’t stop with the paper piecing project and the idea of joining the hexagons together to form a sort of necklace was born.

Here is what i have been working on :

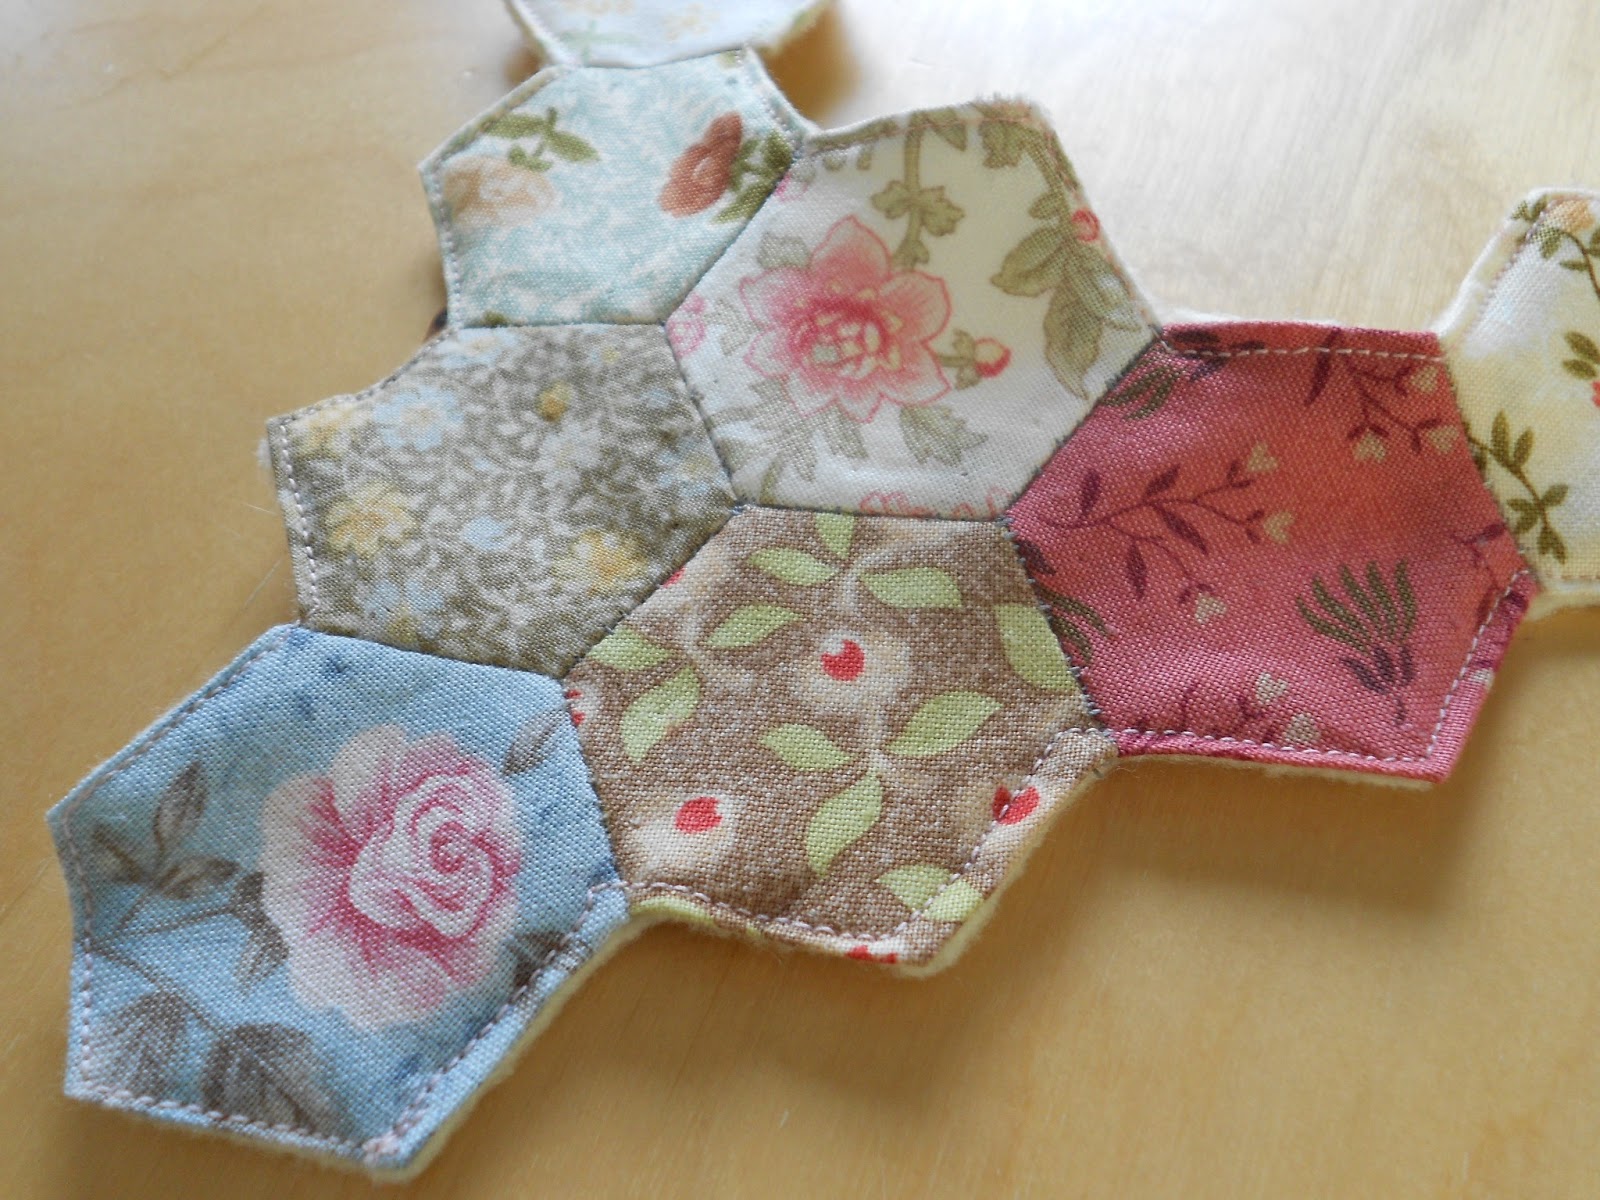
Sewing the hexagons together

The necklace takes form!
The hexagons are sewn onto felt to reinforce the necklace
Metal eyelets fitted ready for some ribbon

Finished necklace complete with ribbon


And here is project number 2! Slightly larger hexagons sewn together with the aim of making a cushion! I'll let you see the finished product...............one day! Until then happy paper piecing!


Project 2 - Bedroom cushion


Sunday, 10 February 2013

Cath Kidston Cross Stitch Cuteness


Now that we are officially in February this marks the end of my first craft month. But before I announce my next craft task I need to update you on how January went. There just isn’t enough hours in a month to take a craft by the horns and make something spectacular. Then again an end result doesn’t necessarily have to be large scale. Like the majority of people I have a full time job and try and juggle lots of other things on top, but I don’t want this to deter me from crafting. So even if I don’t make something large or particularly fancy I don’t care, for me I have still accomplished a new skill and maybe even a new finished product.

My Cath Kidston cross stitch is now completed and all I have to do is remove the soluble material and sew up the bag. Although it is small scale I am really happy with the result. On the whole this cross stitch has been simple to do, it is a craft you can do in front of the TV but you still do need to have some wits tuned in to ensure you count correctly......which I learned the hard way.

The one thing I have learnt with cross stitch is that it is important to have a good light source. I usually do mine late evening, the light in my rooms are not so great so sometimes I found it quite challenging to see the holes in the soluble fabric properly. That aside with a desk lamp I reckon you would have no issues.

Here is the finished version of my Cath Kidston cross stitch. Truth be told the second set of flowers on the left are supposed to be identical to those on the right. Not only did I manage to lose my thread, I counted wrong too, hence the free styling. Bet you didn't even notice til I just said!

Cross stitch finished but tacking thread still on
Finished!!!
 But my crafting ambitions are never fulfilled and with every craft I do I am always keen to design my own pattern and do my own thing. I bought some oatmeal colour 14 point fabric and bought a selection of threads in my favourite colour ways, pastels!

Being presented with a blank canvas and no pattern can be quite daunting! So simple was the key!
I started off dabbling with some small simple hearts and then decided to take a section of Cath Kidston’s design, change the colour way and amend the design a bit. Small simple designs were what I wanted to create.

Happy with the results I decided that I wanted to create a design which would be all colour. I came up with the idea of stitching a bow and colouring in the space around it. This I did with no previous inspiration unlike the hearts. I tried to sketch out my idea on squared paper but it was hard for me to visualise , stitched so I decided just to take the plunge and start with the centre of the bow and work outwards. It is the most basic shape but I think the design really stands out due to the colour palette.

Here is my work in progress:

Work in progress

Feeling pretty happy with my designs I decided that I didn’t just want to leave them on the fabric to eventually gather dust in a drawer. I’d seen many people do mini cross stitch designs and make them into buttons, so sweet and versatile. Being a fan of buttons and using self covering buttons to make jewellery I naturally started to head down that vein.

Making a button using self covering buttons.

Finished floral button, I love it!
I decided that I wanted to do the same with my bow design and mounted it onto a larger self covering button.

Original bow design button
For me the floral and bow cross stitch designs really came to life when made into a finished project. I am so pleased with it, the question is shall it remain a button or be used to make a set of earrings or a ring.......

I guess you will just have to wait and see............

If you are a cross stitch fan get in touch and share your handiwork. You can either leave your comment below or post a photo of your work on my Facebook Page – Camilla-Erika Jewellery and Accessories or on Twitter@CamillaErika 1

Monday, 14 January 2013

Crafty Challenge 2013 - A Craft A Month........


This year I have decided to take a new approach with my blog, as well as feature projects I’m working on for Camilla-Erika and DIY house projects I have decided to challenge myself to master a different craft each month.

With the inspiration of the 365 project, or the craft equivalent of 365 crafts a day I decided to set myself a challenge. With my Masters in International Marketing Management completed and a new job started I am now ready to get back to my crafting roots, experiment and learn.

A Craft a Month........

Each month I will take on a new craft, or a craft in which I have dabbled but not yet mastered. Maybe mastered is not the correct term, I want to try new crafts that are not necessarily within my crafty comfort zone and challenge myself to try something new.

My aim each month will be to introduce myself to a craft, try out a few simple designs and then produce my own design by the end of the month, or if not complete at least be underway. As an element of surprise I will not be revealing what craft I will be working on in advance, you will have to read to see. Each week I aim to give you an update of how I am getting along, struggles and all!
So let’s begin......

January 2013 will see Camilla doing.............................CROSS STITCH

Ok, so cross stitch, may not be the coolest or hippest craft, you may not even like the look of it. I have to admit I have never been a massive fan of this craft but recently I’ve started to change my mind. I want to demonstrate like so many others that cross stitch doesn’t HAVE to be old fashioned or something you wouldn’t want. Cross stitch can be whatever you want it to be. With a bit of imagination and some inspiration from magazines and designers you too could ignite the old craft you left back in the classroom.

Cross Stitch Design by Lesley Teare


So what made me pick cross stitch? I was scouring the newsagents for a craft magazine to read and having already bought all my usual ones (I’m obsessed) I came across “CrossStitcher”. With the mood for trying something different I had a look and saw the design by Lesley Teare of a bird. Being a fan of pastel colours and the vintage look this design appealed to me, I parted with my money and that was that, cross stitch had officially re-entered my life.

Now of course if I am going to take up a new craft I don’t want to fork out loads of money just to decide it will live in the bin of unfinished projects. Initially, I was determined to jump straight in and complete the bird design, unable to get the fabric I required I started to look around my local craft shops. Cross stitching kits were on sale but I didn’t want to spend £20+ on something I may end up hating let alone have the patience to complete. Something then caught my eye, tiny little cross stitch kits were being sold for £2.50. What a great way for me to try it out without spending too much money. Even better everything you required was in the pack!
Mini Cross Stitch Kits 

I bought three, but the design I chose to do first was a little cupcake. Not too many colours and a nice and small simple design. It was a modern design, in fact most of the designs on sale had a modern look to it, dispelling the myth in my head that all cross stitch was old fashioned and drab (sorry cross stitch!).
Cupcake Design Half Completed

I haven’t totally completed it yet, as you can see I am still working on the outline. It is a great little kit though, perfect for beginners and small so you can finish it relatively quickly and get the “I’ve done it!” satisfaction quickly.

Almost Complete!

As I am impatient I wanted to progress onto something bigger rather than do another little kit. I remembered a book I got a while back that I’d look at and said “wow I love this stuff, I will have to do something in here one day....” of which one day became never and the book ended up on my shelf. The book is Cath Kidston “Stitch” and this time when I picked it up I got all excited again, scouring through the different stitching projects and deciding which cross stitch design to do first. When I bought the book a freebie was included to allow you to cross stitch a floral design on some pre-printed fabric which you then make into a bag. PERFECT! It was decided, this would be my next project.

Cath Kidston "Stitch" Book

Instead of cross stitching straight onto Aida this requires stitching straight onto fabric, just like you would do if you decided to stitch onto a piece of clothing. Soluble cross stitch material was supplied to use to ensure that your design is evenly stitched and straight.  Excited, I launched myself straight into it, tacked on the soluble material and began the design.

Tacking the Soluble Cross Stitch Canvas and Marking the Centre

If you aren’t familiar with cross stitch then it is important to take time at the beginning to find the centre of your design and tack thread to mark the outline. This will ensure that your design is straight and will really help you with counting out the stitches. Start from the centre and work outwards.

This is what I have done so far. 

Progress of Cath Kidston Design 

I'd forgotten how simple cross stitch was, and although you need to concentrate to count out your stitches it really is a relaxing craft you can do in front of the TV. 

Have I managed to convince you to give cross stitch another chance????