Total Pageviews

Thursday, 24 February 2011

Bits of This, Bits of That............

I am going to start this weeks blog off with introducing you all to a new shop on Folksy! My friend Kirstie who I mentioned in my last post, has set up her shop so it would be great if you could go and have a look! Patchy At Best features homemade cards and illustrations done by none other than Kirstie Smith herself :)


Earlier this week I had a nice surprise sitting in my email box from a lady called Teri. She had emailed me to say that a ring of mine had been featured on her blog!


 My blue roses ring which you can find on my folksy shop  http://www.folksy.com/items/978753-Cadbury-Blue-Roses-Ring, was picked by Teri from Rainbow Cottage blog to be featured as part of her "Treat Yourself Tuesday". For a look at her blog (and my ring on it!) click on the following link!


If you cast your mind back to my very first blog you will remember me talking about the purpose of the blog, (what do you mean you can't remember?! Scroll down and read it haha!)
One of the purposes was to share with you the projects that i will be working on to make my new house a home. Well I haven't got any projects completed yet...............but I may have a home soon!

Myself and David have been really busy viewing properties,viewing them again, reading mortgages, getting confused, reading them again and so forth. Good news is we have found somewhere we would like to buy! We are busy trying to get everything sorted out to hopefully make this happen. We shall see though! Of course I have already started deciding on which wallpaper to have in the kitchen and what flooring to have in the bathroom. I'll try my hardest to take a step back and wait until its all a done deal. I'll keep you posted! :)

Talking of projects I have been working on quilting again! Still with the original project in mind, i have decided to extend my quilting technique repertoire and have a go at traditional English paper piecing. So for now its goodbye sewing machine and hello needle and thread.


Here are the hexagon paper pieces which you use as your templates. Its a simple concept really, just lay your shape on the fabric and sew around it. The idea of sewing into paper sounded odd but once I began it all started to make sense!


These are some of the reproduction 1930s fabrics I have just waiting to be sewn into cute little hexagons and pieced together lovingly by hand!


First of all you need to get a piece of fabric and lay your hexagon on the wrong side of the fabric, secure it by pinning it in place.


Cut about a 1/4 of an inch around the hexagon, you don't want to cut right upto the edge as you need fabric to fold over and baste into place. This will help keep the shape of the hexagon until you are ready to sew them all together .

Make sure you use a long stitch to baste as later on you will be removing the paper shape. 
Voila a finished hexagon! Now time to get busy and make some more...


Once you have some basted hexagons you can start joining them together. To do this place two hexagons right sides together and sew with small whip stitches. You want to sew the very edge of the hexagons without sewing through the paper.


Keep joining your hexagons together and you will end up with something like this. This is as far as I have got with my project. I have to say I'm quite enjoying it, its nice and stress free! Not to mention portable! I plan on taking it in the car on my trip to Crieff tomorrow. Just as well I'm not driving however it may hinder my navigating skills.........

See you all soon for more news and crafting!!!


Friday, 11 February 2011

Craft Connections And Making Jewellery

This past week has been an interesting one on the crafting front, I seem to be meeting more like minded people by the minute! Firstly I went to paint ceramics at a new place in Aberdeen called “I Heart Art” where I met Janet and Mitchell who run the company. They are bursting with ideas and interested in networking and developing the crafting scene in Aberdeen. You can read more about what they do here

My friend Jenna wants to ice her way into making a cupcake business and my friend Kirstie has decided she wants to jump aboard the crafty boat and get selling and making too. So I have spoken a lot this week about crafts. It’s great to have ideas bounce off other people and hopefully to pull together and create opportunities for each other.

My business opportunity brain has also been switched on and without saying too much hopefully I will be having more opportunities to sell my work, but more on that when things are more cast in stone.

With all these craft ideas floating around my head I thought it was about time I started to produce some more work, so I have been scribbling away!

My project on the go right now is shrink plastic jewellery. These little plastic delights are based on designs and drawings I have done. In the past I have made them using permanent Sharpie pens, however I have decided to broaden my shrink plastic horizons and use coloured pencils. It almost seems like a step back into my childhood using coloured pencils but I have to say I am happy with the results! The colours turn out well and the colour choice is much larger than the Sharpie counterparts, not to mention not as pricy!

But some of you may be thinking, what the hell is Shrink Plastic? So I usually begin trying to explain that Shrink Plastic is something you probably used as a kid…..maybe in school. You draw on it, put it in the oven and it shrinks down. Now this is where I get about 30% of people going "oh yea I remember" whilst the other 70% just look confused. So to give you an idea this is what it is like!


First of all you grab a piece of shrink plastic and draw your design on it, there are various types of shrink plastic but I like to use the frosted type for the majority of my projects. The thing to remember is that you need to draw a much larger image than you want the final item to be as when it goes in the oven it will shrink (hence the name).


Once drawn, carefully cut out and punch holes in where you would like to attach the piece to either a necklace or earrings etc


Pop them in the oven and watch them curl! This may seem a bit strange but don’t worry! Even though they are curling and flipping about they will flatten themselves out! Then when you have taken them out of the oven, quickly place a heavy book on top of them to ensure they are flattened! Hey presto! Once cooled you will need to glaze them to seal in the coloured pencils, however you can’t do this with Sharpie pens as they just seem to run... boo.....

If anyone is interested in trying it let me know and I can always give you some more detailed advice. The shrink plastic comes with useful instructions on how to use it and what temperature to set the oven to. Most of it however is trial and error I have to say. It's easy to get a hold of it too, I get my Shrink Plastic from Hobbycraft.

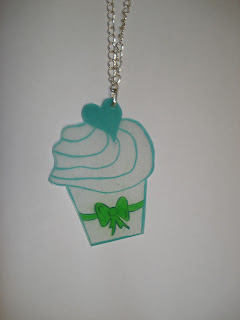
So without further a do here is what I am working on, these have recently been shrunk and glazed and are waiting to be fixed onto a necklace or have earring backs glued onto them.


Everybody loves a good cupcake!


I prefer my popcorn salty to sweet. What about you?

An assortment all waiting to be made into earrings


Bring on the pendants waiting to be made into necklaces


Couple of pieces planning on becoming brooches


And these are just a tip of the Shrink plastic iceberg. Now I'm off to do some more doodles and rack up a large electric bill!


Friday, 4 February 2011

I can’t really Quilt but I can try………….


I'm going to start off my new blog with a bit of quilting that I am attempting to do.

My mother is a fellow crafter and loves quilting (and buying lots of sewing machines!) She is helping me delve into this uncertain world of quilting, but before I bring my project to your attention I wanted to show photographs of some of the quilts my mum has made (and she has made many). As you can see I have big boots to fill!

Baltimore Bouquets, this is one of my favourites!


Buzz Saw, love the colours!


Blue Fanblades


Over Christmas whilst staying at my mum’s I made good use of her expertise and equipment and began trying my hand at a couple of squares. I have a thing for something called 1930s reproduction fabrics so I decided to base “untitled and unsure what it will actually be” piece around these lovely fabrics!
  

Florals!!!!


The first square I attempted was the Card Trick. Hopefully not too tricky…………the thing with quilting is that it is a very precise and accurate craft…… I am not so precise and accurate...


The quilting master (ie. my mum) helping me to cut out all the bits......more accurately than me!


Sewing all the pieces together


Then sewing the squares together


Hey Presto!!


Here is the finished first square! I'm pretty happy with it and thanks to Mum its the right size........don't get too excited I have since tried to do this again unaided, not quite the same result Lol Watch out for that in a future post!


So feeling happy and proud I cried out "I want to do more!!!!"
And that I did........


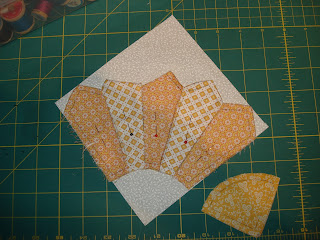
Cue Mary's Fan Block, looks like a sun to me so i picked these lovely yellows!
Cut all the bits out ......leave some fabric to tuck under and use the pencil marks as a guide to sew along. These will be hand sewn onto a background of cream (a technique called applique)


The individual "rays" pinned onto the background fabric ready for the hand sewing to begin


The finished first 2 blocks and no.....the pencil marks aren't supposed to be there!
School girl error, should have drawn on the BACK of the fabric not the front.......where is my stain remover? Need to get this in the washing machine!

Ok, pencil marks aside I still wanted to crack on! I was quite liking the idea of using the same colours in each block but with different fabrics, i loved the simplicity of it. It makes me think of old cottages........somehow

So talking of old cottages look what block pattern I came accross.... a house! Perfect! This time i was going to go with a blue theme.


This block combined both machine sewing and hand sewing.


Top part of the roof complete, now for the main body.

Windows and door sewn on with a little blue button to finish it off.......well almost. I still need to add some lace to the bottom of the roof where the gutters would be, much prettier!

So that is where I am with my little unnamed project. Watch out for more soon! And if you have any ideas of what I should actually make leave a comment! It won't be a quilt though I'm not ready for that...yet!


Tuesday, 1 February 2011

Welcome Welcome

“Why don’t you start a blog?” suggested my friend Jenna whilst thinking how I could advertise my shop on folksy.

“I could but I don’t know how.”

To be honest I still don’t know how and a few months down the line I still have the same worries. My written English isn’t the best of standard, my grammar is not something to write to my school English teacher raving about and I have a tendency to whittle on probably losing the interest of anyone who has decided to read this blog. Not to mention the worry of will anyone actually be interested in this?

However despite all that I’m giving it a go!

My reasons for venturing into the blog o sphere are mixed. My initial reason was to use this as a way to promote my folksy shop which I launched end of Oct 2010. http://www.folksy.com/shops/NeonHazeDesigns is my shop which sells at the moment a variety of unique and different jewellery I have designed and made.  Don’t get me wrong this is still very much up there but the reason has developed.

I am a crafter and I love to make things, I love the fact that crafts are more popular than ever so much so that even prime time tv are talking about it, thank you Kirstie Allsopp! And it’s really Kirstie that has helped me realise that I too want to embrace the idea of a home made home and this is where I’m going to document my creations and discoveries!

2011 will see some exciting times ahead as me and my partner (that sounds far too old!), me and my boyfriend David will  be buying our first house (or that’s the plan!) And you know what that means? It means a blank canvas and a chance to make a real home made home! Endless years renting has not been the same, you can never quite get the house to be how you want it, not being yours and all! I hope many happy months will be had making cushions and other odds and ends for the new, yet to be discovered house!

I can’t promise to blog ever day or every week but I’ll give it my best shot and at the very least you can always enjoy the photographs.

So goodbye for now and welcome aboard the ship Camilla, we shall set sail together very soon! Ahoy!

Camilla
xxx

Neon Haze Designs - Link to my shop!