Total Pageviews

Thursday, 23 June 2011

New Week, New Crafty Skills

This past week has been all about me learning some new skills! Some crafty skills and some DIY skills.......throw them into a mix and what do you get? Well you get this..........
 
For a while now I have been admiring people upcycling and making old furniture a bit more jazzy. Moving house is the PERFECT opportunity to start dabbling in all sorts of crafts so when we went to go and buy our kitchen table and chairs I knew I wanted to treat them to a lick of paint. In fact you could say I have gone a bit nuts for spraypaint!
 
I have been spending so much time in B&Q lately choosing wall paint, choosing wood paint and spray paint but I still feel like a bit of a novice. No better way to learn that just to dive straight in!

 
Project one was this standing lamp that I bought at a furniture charity shop! I knew I wanted to duck egg blue it up and luckily I found the perfect colour. I didn't quite realise until I began painting with it that it was an oil based paint. This meant that it was a bit gloopy, it was smelly and it would take a while to dry. Oh well lets soldier on!
 
First task was to get all the lamp sanded down. Its a bit tricky with all those nooks and crannies! Then time to prime it and finally get the colour on!

 
Sanded down lamp
 
The duck egg blue lamp!
 
 
Voila! Didn't buy a big enough lamp shade though.....oppps


For my first chair I decided to use spraypaint. http://rustoleumspraypaint.co.uk/product/painters-touch
Rustoleum Painter's Touch. It comes in such a range of colours but I fell in love with this French Lilac colour.
 
First job was to sand down the chair to "key" it, basically for the paint to stick to something. I also decided to spray on a coat of primer. Primer acts in the same way it provides a surface for the paint to adhere to.
The spraypaint dries quite quickly with a 20 minute drying time which comes in handy when the Aberdeen weather decides to go from sunny to pouring with rain.


David helping me sand
 
 
The primed chair with its first spray of Lilac!

 
Next stage once the primer was dry was to apply the French Lilac colour. I find spray painting a bit addictive. You begin your project and you come to love the results and just want to keep on going. It is so easy and easy to get to all the hard to reach bits too! All you need is a bit of newspaper on the ground and voila!


Doesn't it look nice? I was in two minds whether or not to distress it a bit but to be honest i love the solid a colour! The lovely cushions are courtesy of my mum they go so nicely!


Chair number 2 is currently in progress so will feature very soon, a nice Guava Green it will be too.


Alongside spraypainting furniture I also had a go at soap making for the first time with the girls from my knitting group. I couldn't believe how simple it was! Simple = good = I want to do more. As I am writing this I am planning a trip to Hobbycraft to see what supplies they have. Soap is a very pretty, quick gift. Just find a box get some fancy paper and you can make it look really brill. This could be a good contender for Xmas 2011 presents. You have been warned!

How to Make Soap


Firstly you need to cut up the soap blocks and melt them. You can do this in an old pan or in the microwave. We did ours in the microwave. We had two types of soap opaque and clear.
Make sure you keep stirring the melted soap, you don't want a skin to form and it starts to harden quite quickly. It is a good idea to have all your materials ready before hand.


You can put whatever you like in soap. We had special scents and colours that we got from a soap making suppliers. Whilst you are stirring your melted soap add in your chosen colour and scent and keep stirring!
We had a choice of Honey, Sea Breeze, Lavender and Rose scents to choose from.There was also a lot of glitter flying around the table.


Once it is all mixed up nicely (like a cake) you can pour it into moulds. We had silicone soap making moulds but you could also use cupcake cases (we started using these once we run out of moulds!) However if you use the cupcake moulds you won't get such a defined finished shape.


I decided to add some buttons into my soap, not exactly practical but pretty! I was going for the more decorative soap that sat in a bathroom. However I suppose you could use it and as the soap wore down you got some buttons to donate to your next craft project! You can also add dried flowers such as lavender, rose buds, poppy seeds etc.


Once you have poured your soap into the mould and everything is added in you need to leave it alone to harden. We were a bit impatient and took them out earlier than recommended! But keep an eye on it and you will see how long it takes. The recommended time to leave them is 4 hours.


 Not quite 4 hours later this is what we had......


My clear button and glitter soap before its ready......

...And once it has hardened!

This was the opaque soap with some buttons inserted

And buttons added on the top


Fancy giving it a go? Go for it! It is so easy and the results and well worth it!

Thursday, 2 June 2011

The absentee returns!

I thought it was about time I jump back on the horse and get on with doing my blog again! Apologies for the long absence, it has been MORE than a while. But I have a good excuse.............I promise.............my life has been taken over by boxes!


Yes that's right I've been moving house!
 The past month has been manic, with moving, making sure the flat we are moving out of is left in a good condition so I got my deposit back (which I did!) and decorating I've not had a moment to rest. Work has been my rest, but now things are starting to calm down, boxes are being emptied, things put in the loft and walls stripped of wallpaper. We are slowly getting there! I can now breathe a sigh of relief and start doing the things I used to do before the moving bug caught a hold of me and controlled me for so long!

David and I on our first night in the new house! No furniture and no cooking stuff.
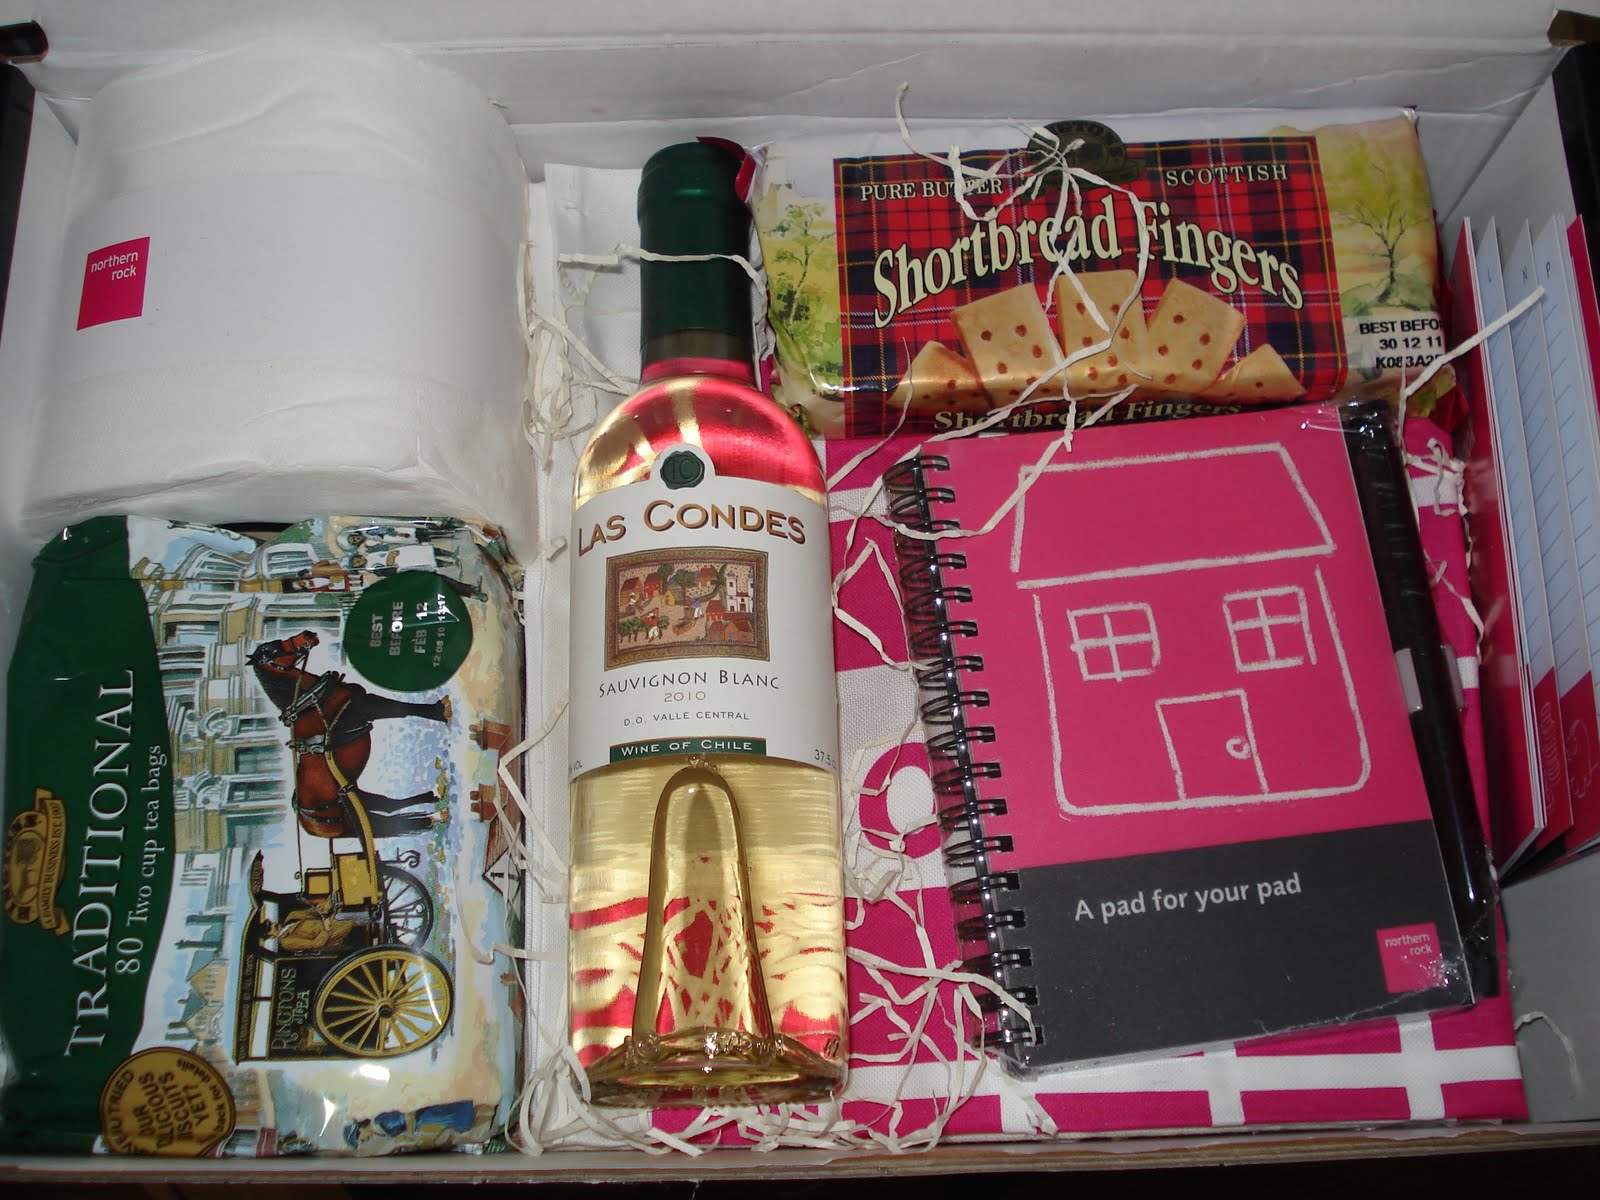
Look what Northern Rock sent us! A welcome pack full of goodies! What a great surprise!

So what is there to update you on? Well of course there is the house. With its ups and downs (and there have been both) we have been very lucky to have David's dad to help fix a multitude of ailments. He really is a bloody good handy man! The current decor is a bit dated shall we say so the whole house will be given the decorating treatment over the coming months! Project number 1 - Decorate the living room.
Who would have thought stripping wallpaper and re-decorating would be so time consuming......... I was a little naive when it came to this DIY malarkey. Hmmmm take the wallpaper off and paint? I think not! I learnt very quickly that re-decorating was not going to be a walk in the park! You need to strip the wallpaper, fill the odd hole (if needed), sand down the wall, then paint???? No no no!
"If you want to get a smooth finish I recommend putting lining paper on first before you paint" David's dad advised. "Then you can paint".
So far it has already taken us about 3 weeks to do it and we haven't even finished doing the lining paper yet.  David and I aren't the most experienced when it comes to DIY but I tell you this is a learning curve! Here are some in progress photographs! At least I have finally chosen my wallpaper and paint. The beautiful Hockham duck egg blue wallpaper by Laura Ashley which will be complimented by Antique Pearl paint from B&Q which we got mixed up especially by using the eau de nil colour from the wallpaper! Exciting!

The wallpaper with many paint samples!


Lining the dreaded walls............

---------------------------------------------------------

So the house aside I have a few other things I wanted to touch base with you about!

A few months ago my work colleague approached me and asked if I would like to design a book cover for a publication her and her friends were putting together. With the title of "Shades of Time" the book consists of a variety of short stories and poems centred around time. I came up with an image which represented the past present and the future and it thankfully approved and used.

Here is my orignal artwork I did.

The other day I got an email from my colleague saying that an author has read and reviewed the book.

The author is a lady called Leila Aboulela and she started her review by mentioning my design.
"Shades of Time, the latest publication from the Lemon Tree Writers comes with an attractive cover by artist Camilla-Erika Campbell. I found myself spending more than an average time studying the image with its three clocks, its past postage mark and the hint of a future" 

You can read the full review and find out more about the publication here
---------------------------------------------------------
Secondly and very importantly I wanted to mention about my business. Neon Haze Designs has under gone some re-branding! Some friends advised me to consider changing my business name to my own name instead and after some deliberating I took their advice and did just that. (Yes you were right all along David!) So its time to say goodbye to Neon Haze Designs and hello to Camilla- Erika.

Apart from my name not much has changed in terms of my product lines. I closed down my old folksy shop but fear not as I now have a brand spanking new folksy and also etsy shop too!

Please go and have a look at my new shops on the following links!

I have also decided to get some business cards and postcards professionally printed! Here is a photo of the front of the postcard.


So remember if you want to go shopping head to the above links! You can also find me on facebook under Camilla - Erika

That's all for now folks, I'll be back soon with another crafty update I promise!!!
Ciao for now!


Friday, 15 April 2011

I Love Laura Ashley

I love Laura Ashley! In fact I love it so much I have exhausted the Aberdeen store, so when I went down to Edinburgh last weekend I used the opportunity to visit their store, and what a pretty store it is! And no I didn't leave empty handed.....

I have become house decor bonkers at the moment and in particular wallpaper bonkers! I am collecting wallpaper samples like it is going out of fashion; I could probably wallpaper a room with all the samples I have collected! The lure of the bargain buckets in Laura Ashley isn't helping either. "Oh this batch end is only £4...............look 2 rolls for £8 great, I can wallpaper insert room here with that!" I am starting to run out of rooms. I can't resist a bargain and I'm too scared if I don't take it, it will get snatched up by some other indecisive Laura Ashley crazy  "thinking" she might use it or worse I will have to pay full price which is quite a lot more in Laura Ashley!

Yesterday marked 3 weeks exactly until we get the keys to our new house. This means its 20 days today! I am starting to feel the stress of moving, I have a massive list in my head of things to do and it keeps getting longer. In fact every time I start thinking about it I just want to run home and pack! 20 days is plenty of time to get organised...........I need to stop thinking about it before I spiral into a panic and start frantically writing lists!

So moving back to Laura Ashley! I wanted to show you some photos from the website of all the pretty things. Luckily one of the wallpapers that I really like called Nina in Eau de Nil is reduced from the expensive £32 to the slightly reduced price of £20 (I think) so I got the thumbs up to get it and hopefully our bedroom will be decorated in it!

Btw please ignore the black dots, I didn't add them in, although David thought I had as a hint to what I wanted, sadly though it's just the interactive buttons on the website not my shopping list.

I wish these were photos of my house I was showing you, not the Laura Ashley catalogue *sigh*


I want I want!

Nina Wallpaper which we plan to have in the bedroom.


I love all the duck egg blue!!!!!!


 I also wanted to show you how I am progressing with my crochet project!
So far I've managed to churn out 12 squares, still not quite sure what I am making but the latest idea is a table cloth for a coffee table.............or a big cushion cover.................or a wall hanging?????

All my 12 squares arranged so far!

Close up of multi coloured squares


My stack of squares!


That's all for this week, catch you next week with only 14 days to go until the big day (roughly) EEK!!!!!
Someone pass me a cardboard box...............


Wednesday, 6 April 2011

Clothes Clothes Clothes With A Bit Of Crochet Thrown In For Good Measure!

It's all about clothes at the moment! I seem to be on a bit of a clothes hunt and unfortunately my bank balance isn't backing me up on this one! Periodically I like to trawl through the charity shops in Aberdeen to find some "good finds", that will usually consist of old, i guess "vintage" (to use the term loosely) clothes and as we already know nick nacks, tea sets etc etc

At this moment in time I am surfing the charity shop wave and I'm having too much luck finding nice things lately I can't stop! Even the dwindling number in my account won't stop me..........well i guess it will eventually! I'm off to Edinburgh this weekend and all I can think about is vintage shops, I will literally have to drag myself to the other end of the city to stop myself, but I just can't get it out of my mind! I actually think I am some kind of money spending junkie.

These days I get so much more excitement out of buying something from a charity or vintage shop and "trying" to alter it (even better if it doesn't need altered!) than I do going to high street shops. Maybe its the fact it is so much cheaper? Maybe its the fact that there isn't a rail with 15 others on them? I just love it!

So I thought today I would share with you some of my home makes, home alterations and charity shop finds!

Lunchtime yesterday gave me the chance to get a nice handful of charity shop visits in and I picked up an old Next shirt (£4.99), a glass water jug with cherries on it (£1.99) and an old markies chanel style cardi in dogtooth(£8.95)! Good news about these is minimal altering required!


Last night I was beavering away in my sewing room trying to swap a zip that had broken on a top I made a couple of summers ago. Poor thing had been sitting waiting to be repaired for months no actually probably more like a year! I love this top, not just the style but the fabric. For all you fabric lovers out there you will notice its Cath Kidston's strawberry fabric very summery! Of course whenever I try and craft nothing ever happens to plan. Why should this occasion be any different?

Firstly it had been a few years since i even sewed a zip in.....................damn it I can't remember how to do it! After studying the broken zip for some time I figured it out. Hurray! Well that would be simple enough if it wasn't for the fact that whilst removing the old zip I managed to rip the top! Disaster...............using my lack of sewing knowledge and a bit of ingenuity I opted to patch it up best I could! Afterall no one will see that bit when I'm wearing a cardigan! All in all I'm very happy with how I did, all patched up, new zip in and ready to wear! Roll on summer!!!


Next project was a skirt I picked up in Barnardos a few weeks ago. I always like to think I can adapt things and this was no different. Thankfully shortening hemlines is something I can do, and I transferred this skirt into a bit more of a modern quirky looking above the knee skirt.


Before I sign off to go and play with more charity/vintage shop buys that need some TLC (believe me I have a few!) I want to quickly share with you some crafting progress!!!

First up are my granny sqaures! Yes Granny was kind to me! (Thanks granny) and with Janet's know how I have FINALLY cracked it. Take a look at these lovelies!


And not forgetting the jumper! Ok ok so its still NOT finished YET. But but but I am so very nearly close!
All ends are sewn in, shoulder seams are sewn together and the neckband is in progress (thanks mum!) so next time I'm over at my mum's she is going to help me sew it and attach the sleeves. But look this is what it look liked on my mannequin.


Oh and one more thing I already have my new knitting projects lined up! Knitted food!!! Oh yes, so useful eh? I am afraid if you come to my new house all you will be served is knitted prawns, not real ones!

Right I'm off to raid my wool supply see you all soon..........